WordPress Theme Development Tutorial (2023)
This beginner-friendly tutorial covers each step, from setting up an environment on your computer, to writing the PHP, HTML and CSS code, all the way to uploading your custom WordPress theme to a live website.
I also point out completely optional tools, frameworks, and plugins that can add speed and consistency to your WordPress theme development process.
How To Create a WordPress Theme Step by Step
Here is the same overall process I use each time I develop a WordPress theme. Although each theme build has different details and approaches, they all require the same basic steps.
Each step in the process is filled with details and options to consider, but the focus is on keeping things simple and moving forward toward the goal of creating your very own custom WordPress theme.
1. Setting up a local development environment
In order to run PHP code on your computer and have a MySQL database, you will need some software.
The easiest way to get started is to download and install LocalWP.
Once installed, you can create a new website through their guided UI. Choosing all default options is recommended.
From there, navigate to the correct folder by using the “Go to site folder” shortcut link in LocalWP.
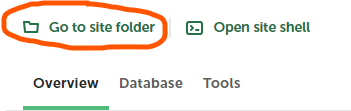
This will open up the root directory of your WordPress installation.
From there, navigate to app/public/wp-content/themes/ directory.
Create a new folder here, name it, and open it in an editor such as VSCode.
You can also use MAMP or Docker if you want a setup that allows flexibility beyond WordPress development.
2. Create a theme folder and basic theme files
Create a folder and choose a name. This will be the name of the theme as it appears in the admin area, unless you specify a different name within the style.css file.
Once you’ve created the theme folder, create these 3 files as well
index.phpfunctions.phpstyle.css
Even though these 3 files are blank, you have technically created a theme which can be selected from within the admin area.
Log in to select your new theme.

Use the convenient on-click admin feature in LocalWP so you don’t have to remember passwords or login when working locally.
Once you refresh the website with your newly created theme selected, you will notice the site is blank because our files are blank. So let’s add some code.
index.php
<?php get_header(); ?>
    <main>
        <?php if ( have_posts() ) : while ( have_posts() ) : the_post(); ?>
            <!-- Post Preview with Linked Title -->
            <div>
                <h2><a href="<?php the_permalink(); ?>"><?php the_title(); ?></a></h2>
                <?php the_excerpt(); ?>
            </div>
        <?php endwhile; endif; ?>
    </main>
<?php get_footer(); ?>
There are a few php snippets on the page, which are signified by the <?php ?> tags.
Anything inside those tags will be interpreted as PHP code.
The have_posts(); the_post(); and the_content(); functions are being used in a while loop and is commonly referred to as the WordPress Loop.
While, If, and foreach are native to the PHP language.
the_post(); function grabs an array of objects from the database. Each object contains information about the post such as the title, content, permalink, and more.
Development Tip: If you want to see the post array data, use this handy little snippet of code which will display the data in a structured format in your browser. This can be useful for debugging and becoming familiar with the data format being returned by WordPress.
<pre>
<?php var_dump(the_post()) ?>
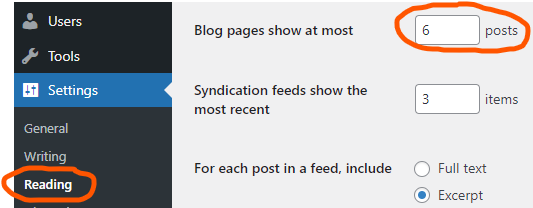
</pre>In the index.php file above, we are using the title of the post in an <h2> tag that also wrapped in an anchor tag, linking to the full article.
This page will show the 10 most recent posts by default. It can be changed in the reading section in the WordPress admin, as shown below.
Next, create header.php and footer.php files. These files will be added to every template with the get_header(); and get_footer(); functions.
3. Create header and footer files
The header and footer files will be viewed across our entire site, with the header containing links to JS and CSS files, meta tags, and our main navigation by using the wp_nav_menu function.
header.php
<!doctype html>
<html <?php language_attributes(); ?>>
<head>
    <meta charset="<?php bloginfo( 'charset' ); ?>" />
    <meta name="viewport" content="width=device-width, initial-scale=1" />
    <?php wp_head(); ?>
</head>
<body>
<?php if ( has_nav_menu( 'primary' ) ) : ?>
    <nav>
        <?php
            wp_nav_menu(
                array(
                    'theme_location'  => 'primary',
                )
            );
        ?>
    </nav>
<?php endif; ?>
The wp_head(); function in the header is known as a hook. A hook is a designated area in the php code which can pass control to supplemental code.
wp_head(); is often used by plugins which need to insert meta tags, scripts and CSS files into the header area of a webpage. (SEO plugins, for example)
The footer.php file will contain our blog name an copyright information.
footer.php
<?php wp_footer(); ?>
    <footer class="site-footer">
        <p><?php echo '© ' . date("Y") . ' ' . get_bloginfo( 'name' ) ?></p>
    </footer>
</body>
</html>
4. Determine templates needed
Before we add our new templates, let’s take a look at something called the WordPress template hierarchy.
You can view the WordPress Template Heirarchy here.
When the WordPress Core receives an http request, it uses this logic to determine what template to use based on whether a page, post, archive, or attachment is being requested.
All entries in the wp_posts database table contain a post type field.
The index.php template is a “last resort” if a more specific template isn’t present.
We can create a single.php template, which is more specific than the index.php template so it will be chosen whenever an individual blog post is requested.
We can do the same thing for pages by creating a page.php, and for archive listing pages by creating an archive.php.
5. Develop a page template, post template, and archive template
Our page.php and post.php templates will be used for single pages and posts.
Alternatively, we could use a single.php file to handle both, but would need to make sure we include conditional statements in the php to differentiate with our different structures.
For that reason, I tend to use separate templates for posts and pages, although using a singular.php file for both is also an option.
page.php
<?php get_header(); ?>
    <div id="content">
        <?php if ( have_posts() ) : while ( have_posts() ) : the_post(); ?>
        <h1><?php the_title(); ?></h1>
        <?php the_content(); ?>
        <?php endwhile; endif; ?>
    </div>
<?php get_footer(); ?>
post.php
<?php get_header(); ?>
    <?php if ( have_posts() ) : while ( have_posts() ) : the_post(); ?>
    <article id="post-<?php the_ID(); ?>">
        <h1><?php the_title(); ?></h1>
        <?php if ( has_post_thumbnail() ) { ?>
            <div class="thumbnail-full">
                <?php the_post_thumbnail( 'full'); ?>
            </div>
        <?php } ?>
        <?php the_content(); ?>
    </article>
    <?php endwhile; endif; ?>
<?php get_footer(); ?>
Our archive template will handle a collection of posts, which are grouped together by category, tag, or author.
archive.php
<?php get_header(); ?>
    <?php if ( have_posts() ) : ?>
        <section class="article-list">
            <?php while ( have_posts() ) : the_post(); ?>
            <article id="post-<?php the_ID(); ?>">
                <h1><?php the_title(); ?></h1>
                <?php if ( has_post_thumbnail() ) { ?>
                    <div class="thumbnail-medium">
                        <?php the_post_thumbnail( 'medium'); ?>
                    </div>
                <?php } ?>
                <?php the_content(); ?>
            </article>
            <?php endwhile; ?>
        </section>
    <?php endif; ?>
<?php get_footer(); ?>
6. Add features support
The functions.php file is where you can register certain functionalities for the site. While there is a wide range of functionalities we can add to this file, we will concentrate on a few:
- Register navigation menus (header and footer)
- Enqueue a javascript and css file
- Add support for Gutenberg block styles and patterns
functions.php
<?php

function register_menus(){
    register_nav_menus( array(
        'primary' => __( 'Primary Menu', 'my_theme' ),
    ) );
}

function register_styles() {
	wp_enqueue_style( 'mytheme_style', get_stylesheet_uri() );
}

add_action( 'wp_enqueue_scripts', 'register_styles' );
add_action( 'after_setup_theme', 'register_menus', 0 );
add_theme_support( 'wp-block-styles' );

?>
Registering a customizable header and footer menu can be done in WordPress with the function register_nav_menus().
It accepts an array of menus, with the key equaling the database identifier and the value being set to the display name which will appear in the dropdown of the WordPress admin.
Once registered, these menus will be editable in the WordPress admin. We will use another function which references the key when we output the menu items in our header.php template.
Enqueueing css and javascript files is done with the wp_enqueue_style and wp_enqueue_script functions.
Theme developers often call these enqueue functions within a single custom function, which is referenced as a call-back function in the wp_enqueue_scripts action hook.
Finally, we will add support for the default Gutenberg blocks. This will allow us to have some simple base styles for our block editor.
7. CSS Styling
While there are many options when it comes to writing CSS, authoring a single style.css file is perfectly fine for simple custom WordPress themes.
Using normalize.css or a reset is generally a good idea as some browsers will differ in their minimal default styles.
In fact, most CSS libraries and frameworks use these as well.
Tachyons and TailwindCSS each offer additional benefits of utilizing a utility class-based approach.
These can really come in handy as projects grow in scope in order to maintain brand and component consistency while keeping CSS file sizes to a minimum.
Sometimes all you might need is good typography and a bit of your own CSS for basic layout.
An online tool like type-scale.com can help you with generating CSS for typography, while csslayout.io can aid in assembling different layout patterns.
8. Managing versions and deployment
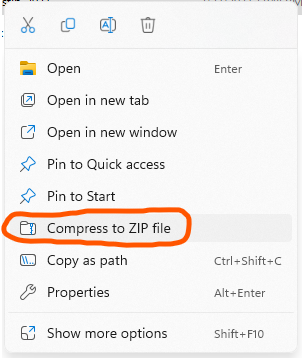
Deploying your theme to a server can be done manually or in an automated fashion.
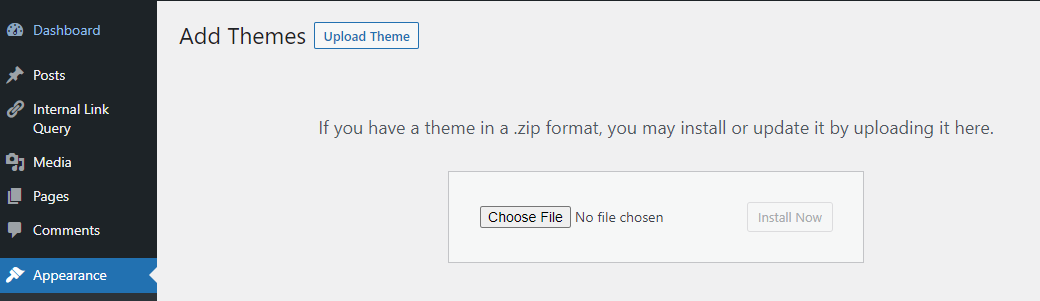
If you followed along and created all the necessary files, you could simply create a ZIP of the theme folder and upload it to your remote server.
Alternatively, you can use a continuous integration process using Github with a dedicated WordPress hosting environment such as WPEngine.
These workflows make managing and updating (or reverting) much easier, and you can even update on a development environment to test updates on a server before going live to production.
There are also 3rd-party services such as Buddy, which can also integrate with Github and your own hosting environment, typically utilizing SFTP as part of the toolchain.
Considerations For Creating a Custom WordPress Theme
Following the steps outlined above, you can successfully create your own basic custom WordPress theme.
However, there are some key considerations not covered in the development steps, such as:
- Will you be working from a design mockup?
- What type of functionality does the theme need?
- Who will be using and managing the website?
Ideally, a theme aims to help both website visitors and website publishers.
A successful theme does both and still supports common plugins which may be required for things such as security or SEO.
How to learn more about WordPress theme development
There are a few ways you could go beyond basic WordPress theme development into more specialized areas to deepen your web development skills.
To start, learning how to read the documentation can really come in handy. This will help you understand the various PHP methods available to you, in order to leverage the data in a WordPress database.
While documentation can be a good way to learn for free, there is much in the WordPress you can learn about to expand your skills and capabilities. such as:
- Headless or Decoupled WordPress
- PHP templating tools
- Create a simple Widget or Plugin
- Integrate CSS build tools such as Sass or Tailwind CSS